.png)
How to Insulate RV Underbelly: Best RV Skirting for Winter
- Latch.it

- Jan 3, 2022
- 7 min read
Updated: Nov 5, 2025
Learn all about insulating the RV underbelly and installing insulated RV skirting to protect the RV undercarriage from the elements.

Most RVs are not designed for extreme temperatures. So when you decide to camp at an unusually cold place, you need to make sure your RV is properly insulated to survive the dipping temperatures. When it comes to insulation, one of the most important and slightly overlooked parts of your RV is its underbelly. It houses important components like plumbing lines and wires that can easily get damaged from the cold.
This is where RV underbelly insulation can really help you out. But how do you insulate your RV underbelly? and what is the most effective way to keep the RV undercarriage safe? Read on as we explore different methods of RV underbelly insulation including different RV skirting ideas and how to skirt an RV for winter.
Why is it Important to Insulate RV Underbelly?

Key components under your RV—such as propane lines, water lines, and wastewater tanks—can suffer damage in cold weather. Proper underbelly insulation offers many benefits:
Prevents Frozen Pipes: Avoid costly repairs from burst plumbing.
Improves Efficiency: Keeps water warm as it travels through pipes, reducing strain on your water heater.
Protects Tanks: Stops cracks and leaks in black and gray water tanks.
Enhances Comfort: Keeps your RV floor warmer, reducing drafts.
Guards Against Corrosion: Prevents road salt and grime from damaging your undercarriage.
Saves Money: Reduces propane or electricity costs for heating.
Deters Pests: Blocks insects and rodents from entering the RV.
Many RVs come with factory-installed underbelly insulation, typically covered with a thin layer of coroplast. While this offers some protection, it may not suffice for colder conditions. For more robust insulation, consider upgrading with the methods detailed below.
Types of RV Underbelly Insulation

Your RV's underbelly can be insulated and protected from the elements in many different ways. However, there are two basic types of RV undercarriage insulation based on how they are installed and the type of protection they offer.
Permanent Insulation: Installed directly into the RV undercarriage, providing long-term protection. Ideal for full-time RVers or those traveling frequently in colder climates. Professional installation is recommended.
Temporary Insulation: Often involves RV skirting, designed to be added and removed as needed. Perfect for seasonal or occasional use and typically a DIY-friendly solution.
How to Install Permanent RV Underbelly Insulation
If you're comfortable with a DIY approach, here’s a simple step-by-step guide:
Inspect and Measure: Check the underbelly for cracks or leaks, repair as needed, and measure dimensions accurately to determine the amount of insulation required.
Remove Components: Carefully detach the coroplast and any piping or wiring beneath the RV. Take photos to ensure proper reinstallation later.
Install Insulation: Use high-quality materials like rigid foam boards or spray foam. Apply fire-resistant sheeting between layers for safety. Ensure the insulation fits snugly in joists, and seal gaps with caulk or additional seams.
Reattach Components: Securely reconnect pipes and wiring, referencing your earlier photos.
Seal and Cover: Reinstall the coroplast, apply seams, and clean the area to remove debris.
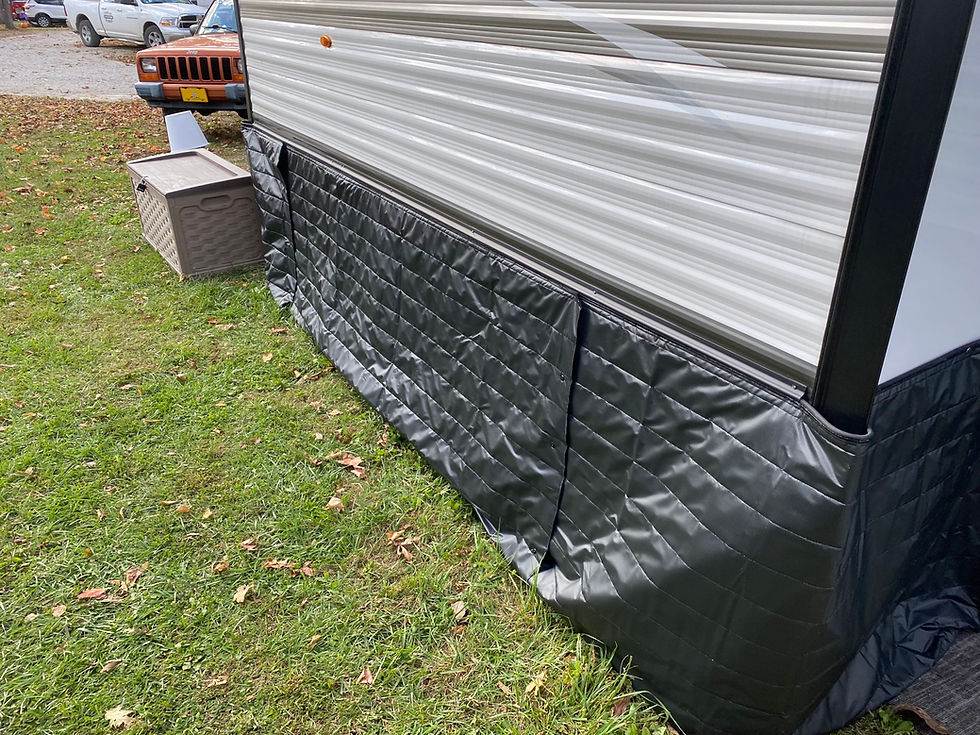
What is RV Skirting and Does it Work?
RV skirting is one of the most popular ways of insulating the RV underbelly temporarily. We say temporarily because the skirting needs to be installed every time your park your RV and then removed and stored when you hit the road. An RV skirt is installed all around your RV to shield the undercarriage from the effects of the elements. There are many different kinds of RV skirting available in the market, each with its own set of pros and cons.

But does and RV skirting really work? The short answer is Yes, it does. A good RV skirt can keep the components installed on the undercarriage of your RV safe from harsh weather and it is also a good way to control the temperature inside your RV. However, not all RV skirts are made the same and they are not meant to be a permanent RV insulation solution.
Types of RV Skirting Materials
Here’s a breakdown of the most popular RV skirting materials, with pros and cons:
Vinyl Skirting: Durable, reusable, and relatively affordable. Ideal for custom-fitting, though storage and weight can be challenges.
Foam Board Skirting: Cost-effective and easy to install but not eco-friendly or reusable.
Inflatable Skirting (e.g., AirSkirts): A modern solution offering convenience and a snug fit. These are reusable but can be pricey and bulky to store.
Plywood Skirting: Economical and great for stationary RVs. However, it's heavy, cumbersome to store, and prone to wear over time.
Insulated Tarps: Lightweight, durable, and easy to source. Insulated tarps can control temperature but may be labor-intensive to install.
Hay Bales/Snow: Inexpensive but temporary. These options may attract pests or require frequent upkeep.
RV Skirting Solutions
There are many ways to install RV skirting on your motorhome, here are some of the most popular ones.
Custom RV Skirting

You can get customized skirts made for your RV by going to a professional and getting your RV custom-fitted. Custom RV skirts are usually made of vinyl and you can choose how many slides you would like to cover your RV. Most professionals would measure your RV first and then make bespoke skirting panels that will fit your RV like a glove. But just like any professional service, custom RV skirting is expensive so make sure your investment is worth it.
RV AirSkirts

AirSkirts are an innovative inflatable RV skirting solution. The skirt is made of inflatable tubes that can be filled with air using a pump. As they inflate the tubes create a snug fit around the contours of your RV insulating it form the cold. AirSkirts are available in a number of different sizes and each kit comes complete with everything you need to install it. They are reusable and can be stored within your RV when not in use. The downside? AirSkirts can be expensive and they take up a lot of storage space.
EZ Snap RV Skirting

EZ Snap RV skirting offers a custom fit without the hefty price-tag. You can find EZ Snap RV Skirting kits in a number of different sizes. Once you receive a kit you have to cut the skirt and install it yourself but don't worry, there are tons of helpful videos up on the EZ Snap website to help you out (and as the name suggests these are easy snap RV skirts). The skirtings are made of Diamond Weave™ premium skirting vinyl that has all the strength of vinyl but is half the weight. The 5th wheel RV skirting is said to last 6-8 years in extreme weather.
RV WindSkirt

RV WindSkirt is a canvas-based tarp skirting that is easy to install and is cheaper than EZ Snap RV skirting. The skirting is only available in two sizes but can be customized to fit most RVs. It is designed in a way that the top of the skirt connects to the body of the RV while the bottom hangs low to the ground making a seal between the ground and the RV. Velcro straps attached at each panel of the skirt make it easy to connect and install as per your requirement. RV wind skirting is great for cold weather provided the area isn't too windy.
DIY RV Skirting
Of course you can opt for buying the materials yourself and installing a homemade RV skirting at a fraction of the cost. If you choose RV skirting made of fabric you can easily install grommets, velcro straps, or suction cups to attach the panels to the RV. Vinyl and canvas RV skirts can be held down by stones or rocks places around the RV. Plywood or foam board skirting can be cut and attached to the RV with aluminum tape. You can also use hay bales or snow to protect your RV's underbelly.
How much does it Cost to Skirt an RV?
Skirting an RV can cost anywhere from $100 to $3000 and up depending on the type of RV skirting you choose and how you install it. Custom RV skirt fittings are more expensive than DIY RV skirting kits. High-quality vinyl skirts cost more than simple plywood ones. You can get away with using hay bales and snow as skirting in which case it will probably cost you nothing but these are temporary solutions that are very rarely effective.
What is the Best RV Skirting for Winter?
Choosing he best RV skirting for winter depends on a number of factors:
Where do you plan to camp? If you're planning to boondock in snow clad mountains you need heavy-duty insulation to protect your RV underbelly. A custom vinyl skirting will be your best bet. If you're planning a winter road-trip around an area that doesn't get a lot of wind or harsh weather you can use plywood skirting.
How long do you plan to park your RV? Foam board and plywood skirtings are great for trailers and RVs parked in one place for a long time. Choose tarp or vinyl skirtings if you plan to travel a lot.
What is your budget? Custom vinyl RV winter skirting costs more than DIY RV trailer skirting. When budgeting for RV skirts don't forget to factor in installation and maintenance costs. For example, while foam board skirts are inexpensive, buying them again and again can drive the cost up.
Do you have the right skills and tools? There are many DIY RV skirting kits available in the market. However, if you're not someone who is handy with tools then don't go down that route.
The Last Word
It is important to properly insulate your RV underbelly when travelling to places with cold weather. A properly insulated undercarriage not only protects essential RV components like pipes and tanks but also helps keep your RV warm. Choose an RV underbelly insulation method that suits your RV, your budget, and your travel plans.


The first in our rundown of sorts ofTypes of Bridges scaffolds is the pillar span. The pillar spans are among the most special and direct development plans utilizing crossbeams. The extensions have the help of the projections under the cross shafts. At times, wharfs are likewise added to offer twofold help under the bars to help a more extended life length. In this kind of development, you can join the different administrations of bars and extensions to improve strength.